

MetaMask Export Private Key: Safe Steps (Extension & App)
There are legitimate reasons you might need to MetaMask export private key, migrating to a hardware wallet, importing an account into a different software wallet, or setting up a backup for a specific address. Whatever your reason, the process itself takes less than a minute. But doing it without proper precautions can permanently compromise your funds.
Your private key is the single piece of data that grants full control over an account. Anyone who sees it can drain your tokens, no confirmation needed, no way to reverse it. That's exactly why we cover this topic at FinTech Dynasty: helping you handle sensitive self-custody operations the right way, with clear steps and zero guesswork.
This guide walks you through exporting your private key from both the MetaMask browser extension and mobile app, step by step. You'll also learn what to do (and what to avoid) once that key is exposed.
Before you export a private key
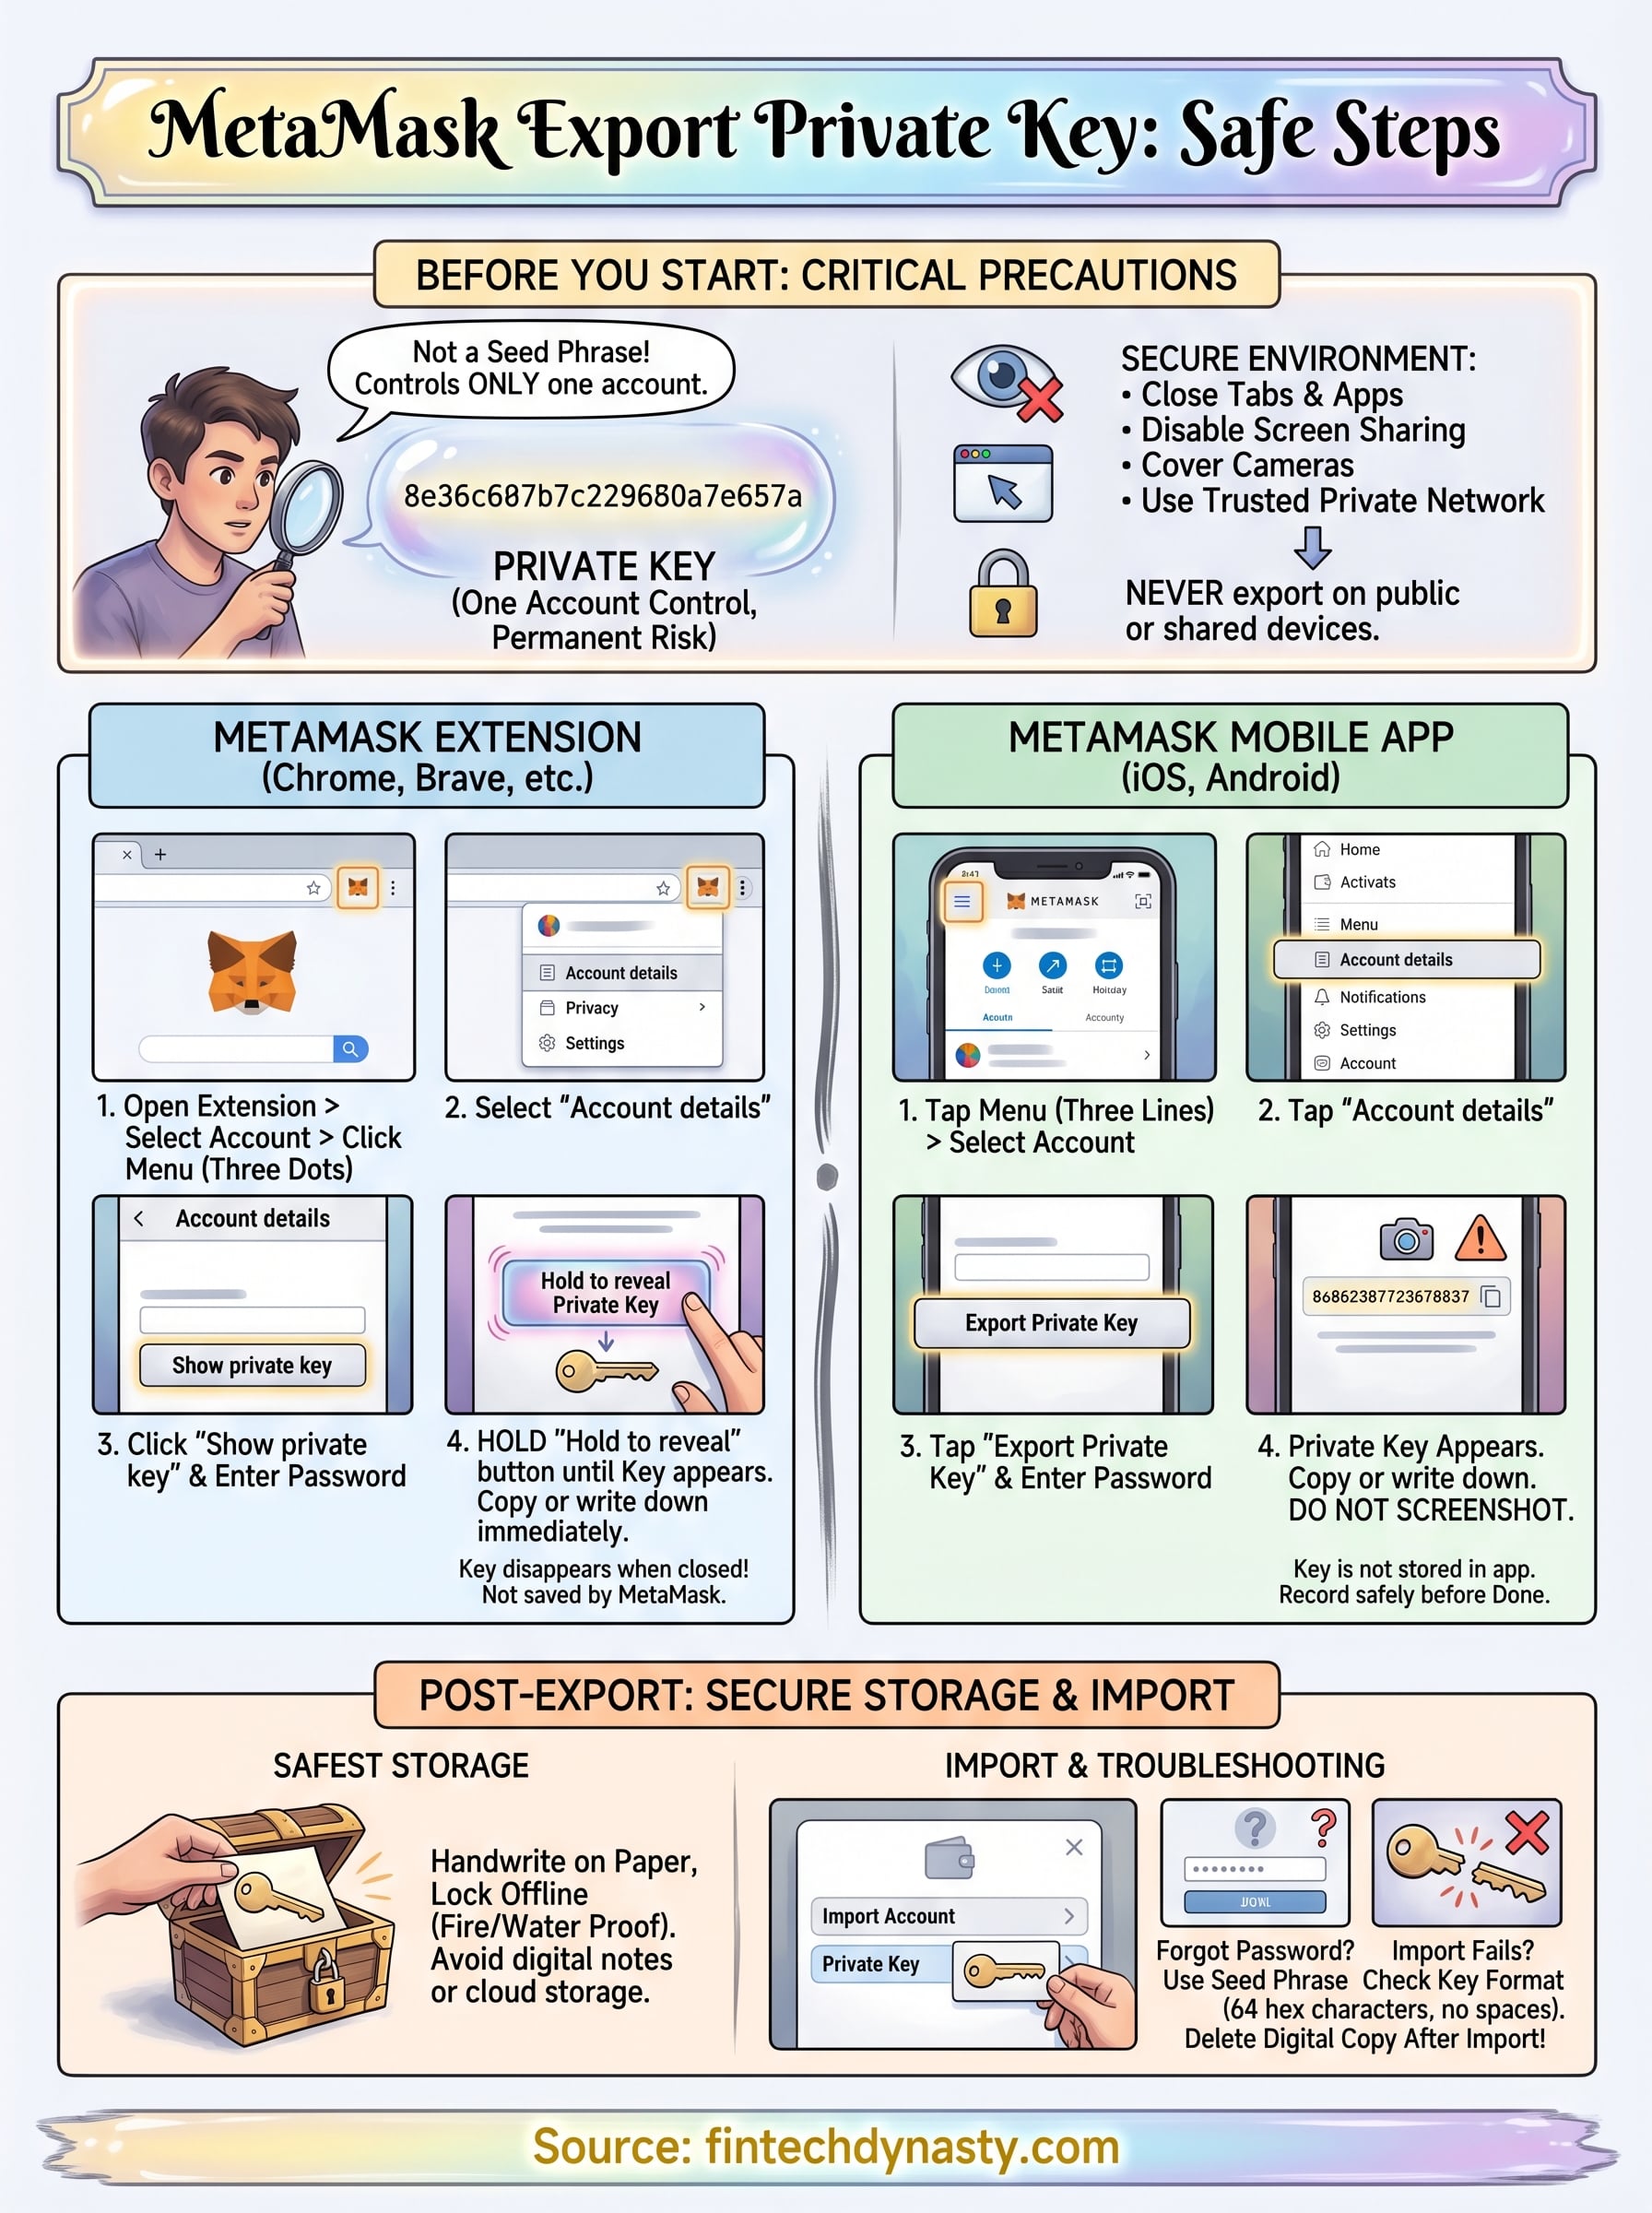
Before you run through the steps to metamask export private key, take a moment to understand what you're actually handling. A private key is a 64-character hexadecimal string that gives complete, unconditional control over one specific account. It is not your seed phrase, which covers every account in your wallet. This one key controls one address.
Understand what you're exposing
Exporting your private key creates a window of vulnerability. The moment that string appears on your screen, anyone who sees your display, accesses your device, or intercepts your clipboard can permanently take your funds. Unlike a forgotten password, there is no recovery option if someone else gets hold of it. Treat this key exactly like cash in hand.
Your private key is also account-specific, not wallet-wide. If you need to back up your entire wallet, you want your seed phrase instead. Know which one you actually need before you proceed.
Never export a private key on a shared, public, or compromised device. Use a machine you personally own and control.
Set up a safe environment first
Taking a few minutes to secure your environment before starting is essential. Run through this checklist:
- Close all unnecessary browser tabs and applications that could log screen activity
- Disable screen sharing software like Zoom, Teams, or any remote desktop tool
- Cover any external cameras pointed at your screen
- Confirm you're on a private, trusted network, not public Wi-Fi
Once your environment is secure, decide where you'll store the key after you export it. Writing it on paper and locking it away offline is the safest option. Keeping it in a plain text file on your desktop is not.
Export a private key in MetaMask extension
The MetaMask browser extension runs on Chrome, Firefox, Brave, and Edge, and the navigation is identical across all four. Before you begin the metamask export private key process, confirm your wallet is unlocked and open in your browser toolbar, and that you've already switched to the correct account.
Only export your private key from an extension you installed directly from the official MetaMask website or your browser's verified extension store.
Steps to export your account's private key
Open the extension, then switch to the specific account you want to export. The private key you receive is tied only to that one account, so double-check the account name and address before you go any further.
From there, follow these steps in order:
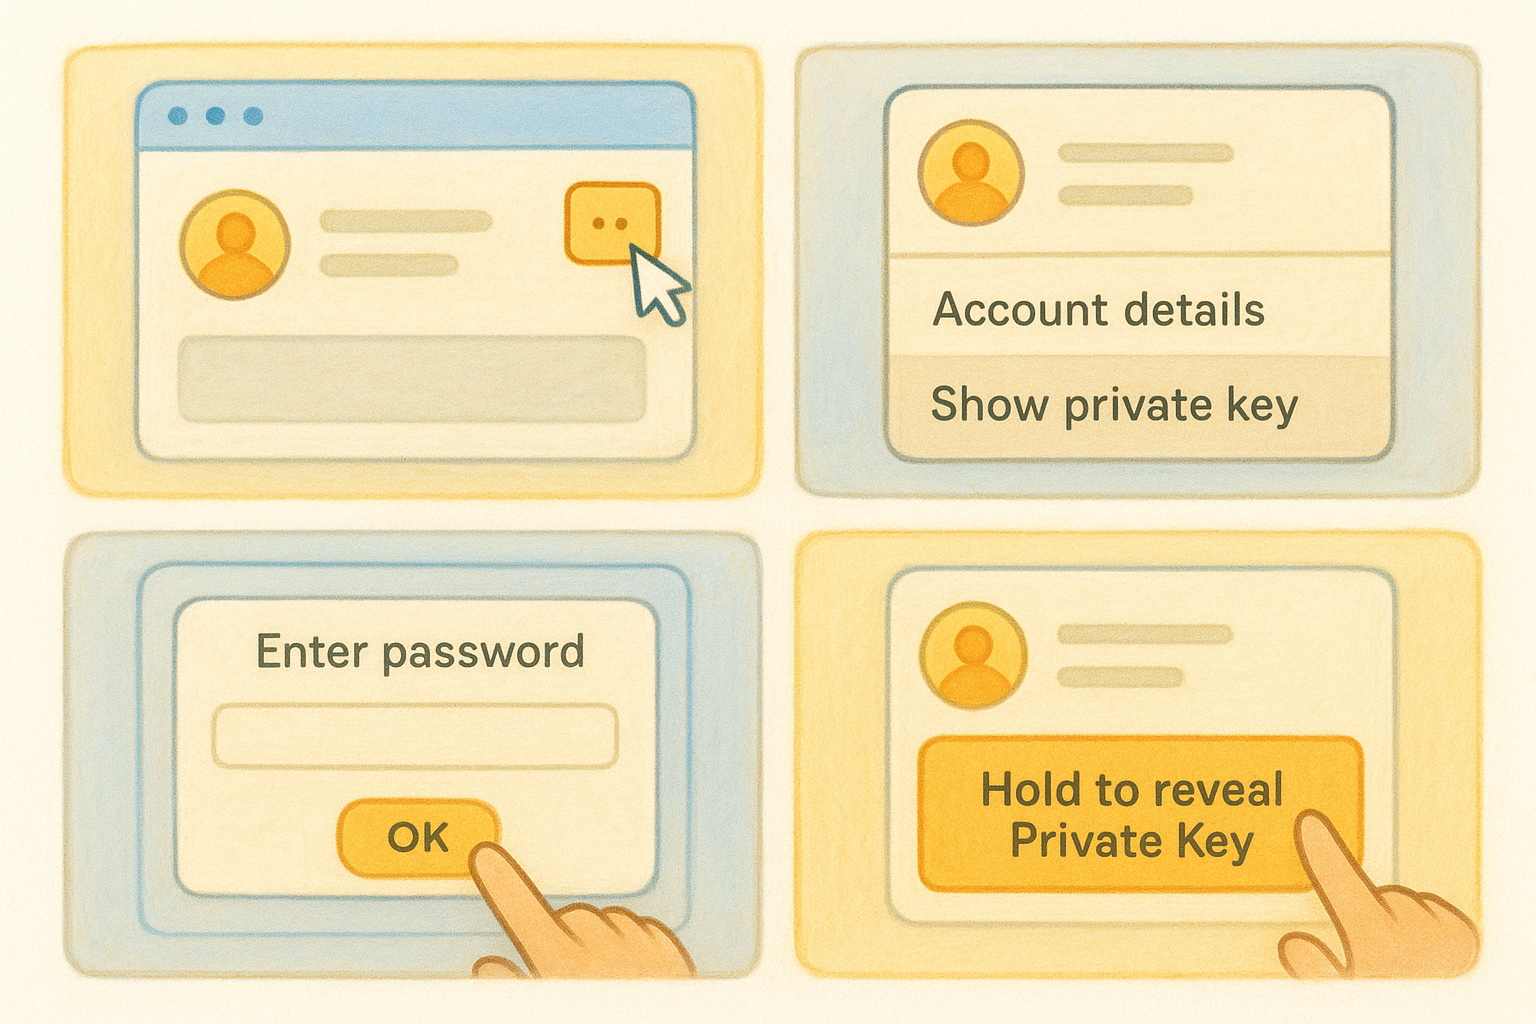
- Click the three-dot menu in the top-right corner of the account view
- Select Account details
- Click Show private key
- Enter your MetaMask password when prompted
- Hold the "Hold to reveal Private Key" button until the key appears on screen
- Copy or write down the key immediately, then click Done
Your key disappears the moment you close that screen. MetaMask does not save a copy for later retrieval, so record it in a secure, offline location before you exit.
Export a private key in MetaMask mobile app
The MetaMask mobile app on iOS and Android follows a slightly different navigation path than the extension, but the core process works the same way. Before you run the metamask export private key steps on your phone, confirm your screen is not being recorded, mirrored, or shared to another device.
Steps for iOS and Android
Switch to the correct account inside the app before you begin. The private key you export belongs only to that specific account, so confirm the address displayed at the top matches what you intend to export.
Follow these steps in order:
- Tap the three-line menu in the top-left corner
- Tap Account details
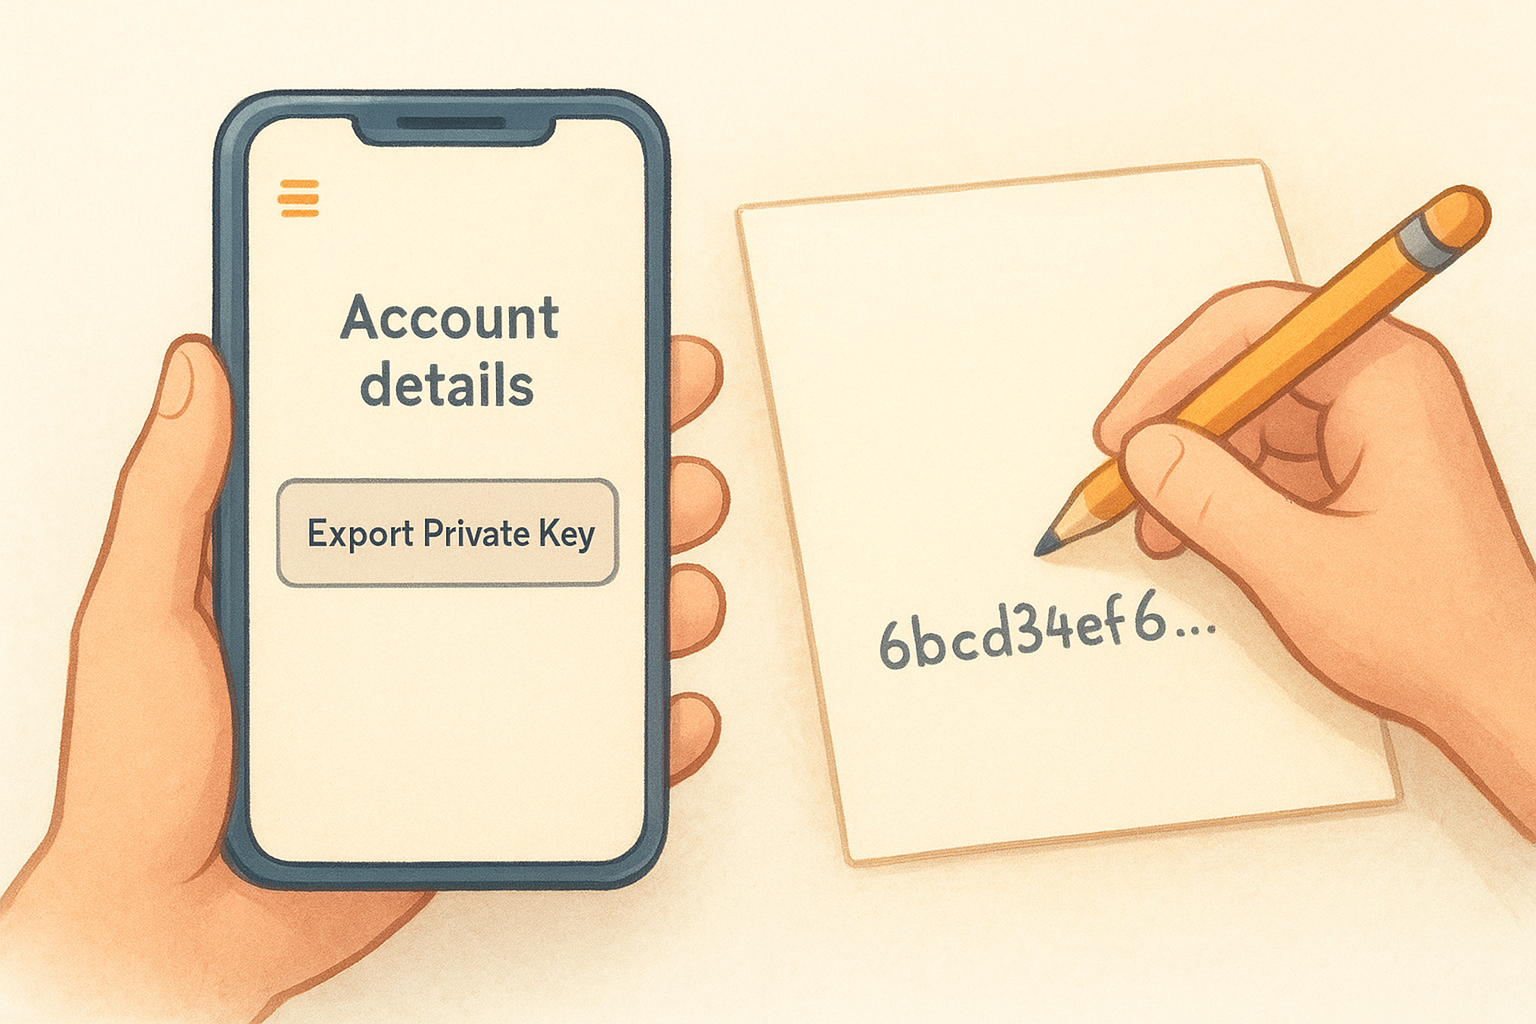
- Tap Export Private Key
- Enter your MetaMask password when prompted
- Your private key appears on screen; copy or write it down immediately
- Tap Done to close the screen
Do not take a screenshot of your private key. Screenshots sync automatically to cloud services like iCloud and Google Photos, which puts your key at immediate risk.
Write the key down offline before tapping Done, because the app does not store it for later retrieval.
Store it safely and use it to import accounts
Once you finish the metamask export private key process, securing that string is your immediate priority. The safest storage method is handwriting it on paper and locking it in a physically secure location, away from moisture and fire risk. Avoid saving it in any app, document, or file that connects to the internet.
Never store your private key in a notes app, email draft, or cloud document. Any service that syncs online is a potential attack surface.
How to import your key into another wallet
Most EVM-compatible wallets support private key import, and the process takes under a minute. Use your exported key to add the same account to any wallet that supports this import method:
- Open the target wallet and find "Import Account" or "Add Account"
- Select "Private Key" as the import type
- Type or paste the key exactly as exported
- Confirm the import and verify the address matches your original MetaMask account
Always delete any digital copy of the key once the import is complete. Keeping extra copies on your device increases your exposure without adding any practical benefit.
Troubleshooting and common mistakes
Even a straightforward metamask export private key process can hit a snag. Most problems fall into two categories: getting stuck inside MetaMask before the key appears, or running into errors when you try to use the key afterward.
Password rejected or the reveal button not responding
If MetaMask rejects your password during the export flow, you're entering your MetaMask wallet password, not your seed phrase or device PIN. These are separate credentials. If you've forgotten your wallet password, your only recovery path is resetting the wallet using your seed phrase and creating a new password.
The "Hold to reveal Private Key" button on the extension requires a sustained press. A quick click will not trigger it.
If the button appears grayed out or unresponsive, try refreshing the extension by closing and reopening your browser, then attempt the steps again.
Key rejected during wallet import
When a private key import fails, the most common cause is a formatting error. The key must be exactly 64 hexadecimal characters with no spaces, line breaks, or extra characters added during copying. Check these points before retrying:
- Confirm the key starts directly with the first character, no leading spaces
- Paste into a plain text editor first to strip any hidden formatting
- Verify the target wallet supports EVM account imports, not just seed phrase recovery
Next steps for safer self-custody
Completing the metamask export private key process is one step in a larger security picture. Exporting and storing a private key correctly protects a single account, but long-term asset security requires a broader approach. The most reliable upgrade you can make after this is moving your funds to a hardware wallet, where private keys never touch an internet-connected device at all. Options like Ledger, Trezor, and Tangem keep your keys fully offline, which eliminates the exposure risk that comes with any software-based export process.
Building that security layer takes real knowledge, not just a checklist. If you want to understand how wallets, private keys, and self-custody actually work from the ground up, structured education makes the difference between guessing and knowing. The FinTech Dynasty crypto education course covers wallets, blockchain basics, and security in plain language, so you can protect your assets with confidence rather than luck.