

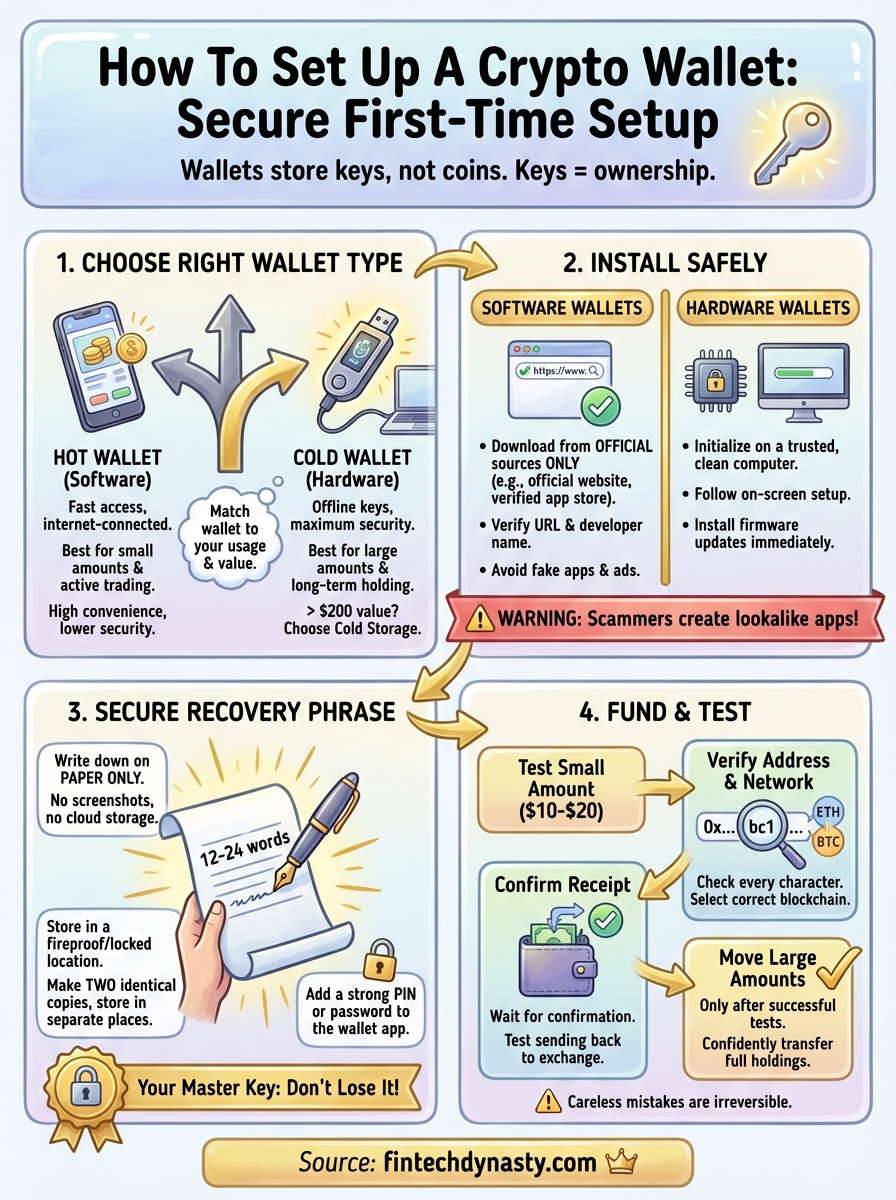
How To Set Up A Crypto Wallet: Secure First-Time Setup
Your crypto isn't truly yours until you control the keys. If you've been keeping Bitcoin or Ethereum on an exchange, you're trusting someone else with your money, and that trust has cost people billions in hacks and platform collapses. Learning how to set up a crypto wallet is the first real step toward taking ownership of your digital assets.
This guide walks you through choosing the right wallet type, creating your first wallet, and securing it properly from day one. No assumptions about your technical background. No hype about which coins to buy. Just practical steps you can follow to protect what you own before something goes wrong.
At FinTech Dynasty, we focus exclusively on crypto security and self-custody, no trading tips, no price speculation. Our goal is to help you understand wallet management and make informed decisions about storing your assets. Everything in this guide reflects that mission: straightforward information you can act on immediately.
Before you start: wallet basics and choices
A cryptocurrency wallet doesn't store your coins. It stores the private keys that prove you own crypto recorded on a blockchain. Your actual Bitcoin or Ethereum never leaves the network, but without those keys, you can't access or move anything. This fundamental concept changes how you think about wallet setup and security.
Three types of wallets exist: custodial wallets (where someone else controls your keys), hot wallets (software connected to the internet), and cold wallets (hardware devices that stay offline). Most people start with hot wallets because they're free and easy to download. Cold wallets cost money upfront but provide significantly better protection against online threats. Before learning how to set up a crypto wallet, you need to understand which type matches your security needs and technical comfort level.
The two main wallet types you need to understand
Hot wallets are applications you install on your phone or computer. They connect to the internet every time you use them, which makes sending and receiving crypto fast but also exposes your private keys to potential malware, phishing, and remote attacks. Examples include MetaMask, Trust Wallet, and Exodus. These work well if you're holding small amounts or need frequent access for transactions.
Cold wallets are physical devices that generate and store your private keys completely offline. You connect them to your computer only when signing transactions, and the keys never leave the device. Ledger, Trezor, and Tangem are the most common brands. Cold storage eliminates most online attack vectors, making it the standard choice for serious holders protecting significant value over time.
If your holdings are worth more than the cost of a hardware wallet, cold storage isn't optional.
Control vs convenience: what you're actually choosing
Custodial wallets like those on Coinbase or Binance don't give you the recovery phrase or private keys. The exchange controls everything, and you're essentially using their internal ledger, not true blockchain ownership. You gain simplicity and customer support, but you lose control and accept counterparty risk.
Non-custodial wallets hand you the complete responsibility for security. You receive a 12 to 24-word recovery phrase during setup, and anyone with that phrase owns your crypto. No company can freeze your account or limit withdrawals, but there's also no password reset button if you lose access. This tradeoff between autonomy and accountability defines your entire crypto security model moving forward.
Step 1. Pick the right wallet for your use
Your wallet choice depends on how much you're storing and how often you need access. When learning how to set up a crypto wallet, most people make the mistake of choosing based on convenience alone, then realize too late they've exposed themselves to unnecessary risk. Start by answering one question: is the total value you'll hold worth more than $200? If yes, skip software wallets and go straight to hardware. If no, a reputable hot wallet works fine for learning and small transactions.
Match your wallet type to your actual usage pattern
Active traders who move crypto daily need instant access through hot wallets like MetaMask or Trust Wallet. You'll sacrifice some security for speed, but that's acceptable when you're working with amounts you can afford to lose. Install these only on devices you trust completely, never on shared computers or phones with sketchy apps already installed.
Long-term holders storing significant value need cold storage devices that keep keys offline. Ledger and Trezor dominate this category, with Tangem offering a simpler card-based option for people who want zero technical complexity. These devices cost between $50 and $250, but you eliminate almost every common attack vector that drains hot wallets.
If you're holding more than a few hundred dollars for longer than a month, hardware wallets stop being optional and become mandatory.
Use this breakdown to decide:
| Your situation | Wallet type | Example products |
|---|---|---|
| Under $200, frequent transactions | Hot wallet (mobile or desktop) | MetaMask, Trust Wallet, Exodus |
| Over $200, holding 3+ months | Cold wallet (hardware device) | Ledger Nano S Plus, Trezor One |
| Large amounts, maximum security | Air-gapped cold wallet | Ledger Nano X, Trezor Model T |
Pick one primary wallet for your main holdings and consider a separate hot wallet for spending money if needed. Never mix your cold storage recovery phrase with any hot wallet setup.
Step 2. Install or initialize the wallet safely
This step determines whether you start with genuine software or fall victim to a fake app that steals your crypto before you even fund it. When learning how to set up a crypto wallet, the installation phase carries more risk than most people realize. Scammers create lookalike apps and phishing sites that rank high in search results and app stores, designed specifically to capture your recovery phrase the moment you generate it.
Download software wallets from verified sources only
Never install a wallet by clicking the first search result or downloading from a random website. Go directly to the official project site by typing the URL manually or using a bookmark you've verified. For MetaMask, that's metamask.io. For Trust Wallet, it's trustwallet.com. Check the domain carefully before downloading anything, scammers register names like "metamask-wallet.com" or "trustwallet.io" that look legitimate at first glance.
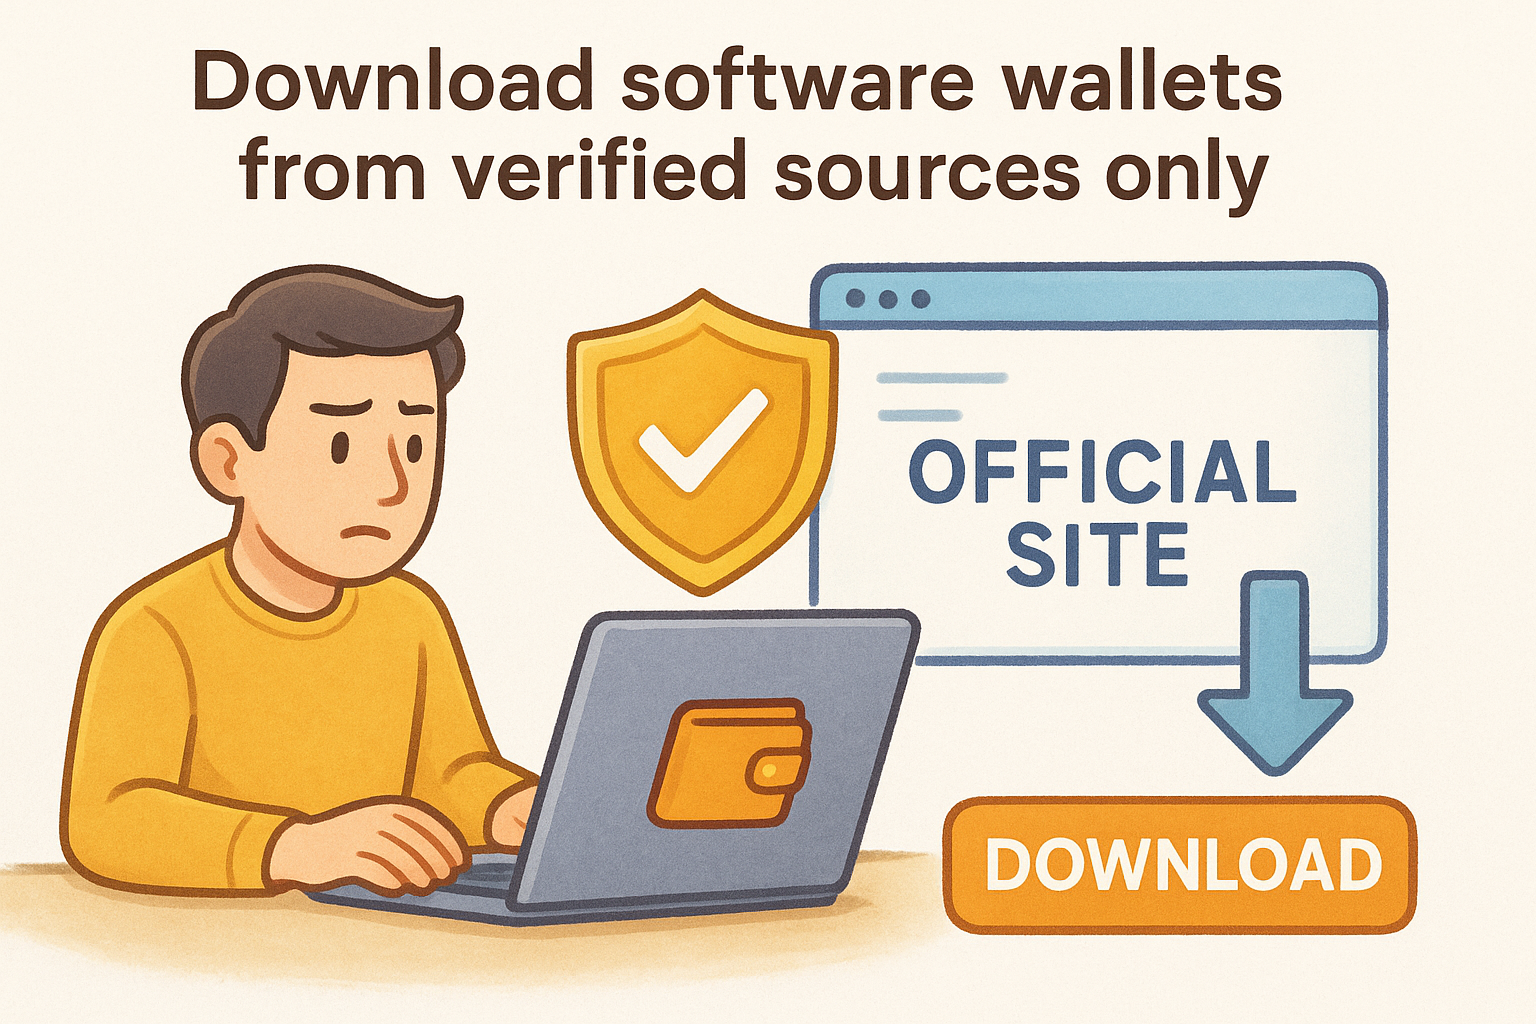
Always verify the official download link through multiple sources before installing any crypto wallet software.
Follow this checklist every time:
- Type the official URL manually into your browser, never click ads or sponsored results
- Verify the SSL certificate shows the correct company name in your browser's address bar
- Download only from official app stores (Apple App Store or Google Play) and check the developer name matches exactly
- Read recent reviews for reports of fake apps or phishing attempts
- Scan the downloaded file with antivirus software before opening it
Initialize hardware wallets on clean computers
Hardware wallets require physical setup and connection to a computer or phone for initialization. Unbox your device and connect it only to a computer you trust completely, never a public machine or one with suspicious software installed. Follow the on-screen prompts to set a PIN code, then let the device generate your recovery phrase. The entire process happens offline inside the secure chip, but your computer still displays the interface where you'll record those words.
Ledger and Trezor devices walk you through firmware updates and basic setup automatically when you first connect them. Don't skip the firmware update, even though it adds time. Outdated firmware contains security vulnerabilities that later versions patch.
Step 3. Secure your recovery phrase and accounts
Your recovery phrase is the master key to your crypto, and anyone who finds it can drain your wallet in minutes. When you learn how to set up a crypto wallet, this step determines whether you keep your assets or lose everything to theft. Write down those 12 or 24 words exactly as shown, in the correct order, on physical paper. Never take a screenshot, never type them into your phone's notes app, and never store them in cloud services like Google Drive or Dropbox. Digital copies create permanent attack surfaces that you can't control.
Write down your recovery phrase correctly
Use pen and paper only when recording your seed words. Write clearly enough that you can read it years later, and double-check every word against what's displayed on your wallet screen before moving to the next step. Misspelling even one word or getting the order wrong makes your backup worthless. Some wallets ask you to verify specific words from your phrase during setup, this confirms you wrote them down accurately.
A single typo in your recovery phrase means you'll never recover your wallet if something goes wrong.
Create at least two identical copies on separate pieces of paper and store them in different physical locations. If one gets damaged or lost, you still have access through the backup copy.
Physical storage that actually works
Store your recovery phrase in a fireproof safe or locked drawer at home, and keep the second copy at a trusted family member's house or in a bank safety deposit box. Never leave recovery phrases in obvious places like desk drawers, filing cabinets labeled "crypto," or anywhere a burglar would search first. Metal backup plates like those from Billfodl provide superior protection against fire and water damage compared to paper alone.
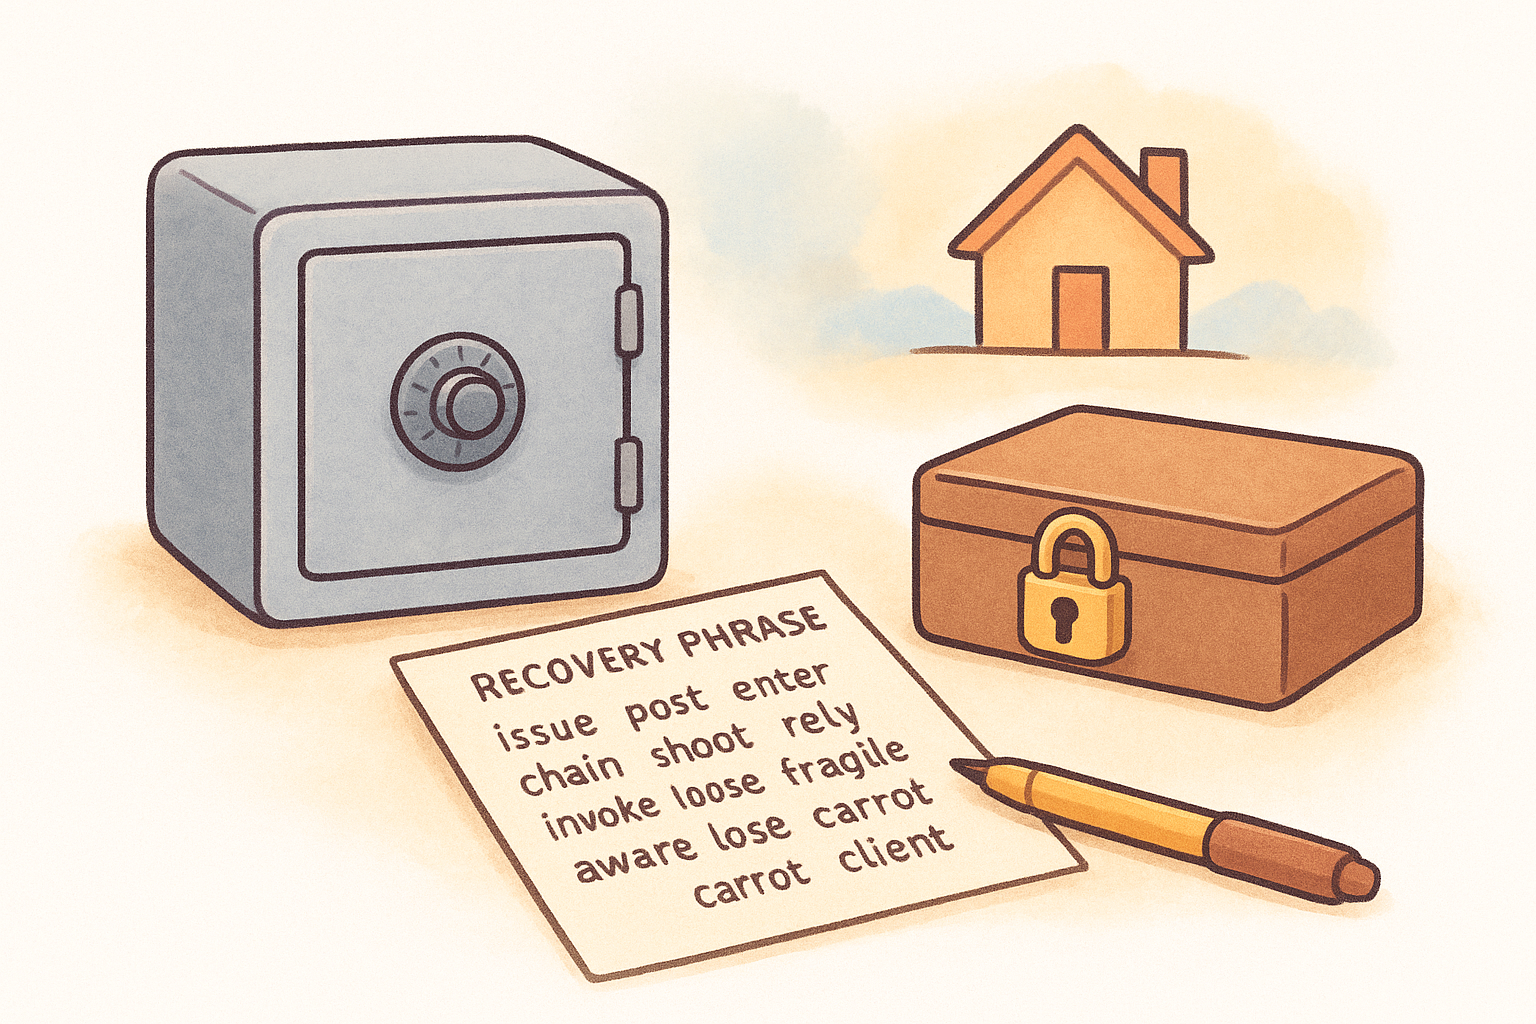
Add a strong PIN or password to your wallet application itself, treating it as a second layer of defense. This won't protect against someone who has your recovery phrase, but it stops casual device theft from becoming immediate wallet access.
Step 4. Fund and test your wallet without mistakes
Most people lose crypto during their first deposit by sending to the wrong address or choosing the wrong network. When completing how to set up a crypto wallet, this final step requires deliberate caution and verification. You can't reverse blockchain transactions, and support teams can't help you recover funds sent to incorrect addresses or incompatible networks. Test everything with small amounts first before moving your full holdings.
Start with a small test transaction
Send $10 to $20 worth of crypto to your new wallet address as your first transaction. Copy your wallet's receiving address by clicking the receive or deposit button, then verify every character matches what you copied before pasting it into your exchange withdrawal form. Bitcoin addresses start with 1, 3, or bc1. Ethereum addresses start with 0x. Mismatched formats mean you're using the wrong network and will lose your funds.
Check that you've selected the correct blockchain network on both ends of the transfer. Sending Ethereum on the BNB Smart Chain network to an Ethereum mainnet address burns your money permanently. Wait for the test transaction to arrive and confirm in your wallet before proceeding with larger amounts.
Verify everything before sending large amounts
Once your test deposit appears successfully, send yourself a second small amount back to your exchange to confirm withdrawals work correctly. Enter your PIN or password, review the transaction details on your hardware wallet screen if applicable, and watch the transaction complete on a blockchain explorer.
After both test transactions succeed, you can confidently move your full holdings knowing the address and network settings work properly. Keep your wallet software updated and never share your receiving address publicly on forums or social media where scammers harvest targets.
Always run test transactions with amounts you can afford to lose before moving significant value to any new wallet.
Quick recap
You now understand how to set up a crypto wallet from choosing the right type through securing your first deposits. Pick cold storage for significant holdings worth more than the cost of the device itself, and reserve hot wallets only for small amounts you actively trade or spend regularly. Download software exclusively from verified official sources, initialize hardware devices on trusted computers you control, and write your recovery phrase on paper stored in two separate physical locations you can access.
Test every new wallet with small transactions before moving large amounts. Verify receiving addresses character by character and confirm you've selected the correct blockchain network on both ends of every transfer. One careless mistake during setup costs you money that nobody can recover.
FinTech Dynasty provides detailed hardware wallet comparisons and security guides that go deeper than this introduction. Visit our complete crypto security resource hub for side-by-side device evaluations, storage best practices, and tutorials designed for people taking custody without speculation.