

AARP Estate Planning Checklist: Steps To Organize Affairs
Estate planning once meant drafting a will and buying life insurance. Now your assets likely include something earlier generations never faced: cryptocurrency, digital accounts, and self-custodied wallets. An AARP estate planning checklist gives you a proven structure for organizing your affairs, but modern wealth requires additional considerations that traditional resources don't always address.
At FinTech Dynasty, we help people understand crypto security and self-custody best practices. That knowledge becomes critical when planning for the unexpected. A hardware wallet without documented access instructions or a seed phrase stored only in your memory can leave your heirs locked out permanently.
This guide covers the core steps of estate planning while addressing the unique challenges of protecting digital assets. You'll learn how to inventory everything you own, choose the right legal documents, and create clear instructions so your family can access both traditional and crypto holdings when the time comes.
What the AARP checklist covers and why it matters
The AARP estate planning checklist breaks down an overwhelming task into manageable steps. You receive a framework for documenting everything from bank accounts and real estate to healthcare wishes and funeral preferences. This systematic approach prevents your family from searching through desk drawers, safety deposit boxes, and email accounts trying to piece together your financial life during an already difficult time.
Core components of the checklist
AARP structures their checklist around five primary categories that capture most estate planning needs. The first covers personal information including your Social Security number, birth certificate location, and contact details for family members. Second comes financial accounts, which includes banks, investment firms, retirement plans, and any outstanding loans or credit card debts.

Healthcare directives and end-of-life preferences form the third section. You document your advance healthcare directive, living will preferences, and organ donation wishes. The fourth category addresses legal documents like your will, trust, and power of attorney forms. Finally, the checklist includes space for final arrangements including burial or cremation preferences, memorial service wishes, and contact information for your attorney or financial advisor.
A complete checklist acts as a roadmap that guides your executor through dozens of decisions without requiring them to guess what you would have wanted.
Why structure matters more than motivation
Most people understand they should plan their estate. The problem isn't awareness but execution paralysis. When you face a blank page asking you to organize decades of financial decisions, you naturally postpone the task. A checklist solves this by giving you specific prompts that you can answer one at a time.
Your checklist becomes a living document rather than a one-time project. You can fill out sections as you remember details, updating information whenever you open a new account or change beneficiaries. This incremental approach feels less daunting than trying to complete everything in a single weekend session.
The standardized format also helps professionals who will eventually implement your plan. Your estate attorney or executor can quickly locate critical information because the structure matches what they've seen before. They won't waste billable hours deciphering a custom system that made sense only to you.
The gap traditional checklists miss
Traditional estate planning tools were designed before digital wallets and cryptocurrency existed. The AARP checklist includes sections for online accounts, but it doesn't address the unique challenge of self-custodied assets that require specific technical knowledge to access.
Your hardware wallet holding Bitcoin or Ethereum operates differently than a checking account. Banks have recovery procedures for heirs who present a death certificate and proper documentation. Crypto assets protected by a seed phrase have no customer service department or password reset option. If your family cannot locate those 12 or 24 words written on paper or steel, the assets vanish permanently.
You need to supplement standard checklists with crypto-specific instructions. This includes documenting which hardware wallets you own, where you store backup seed phrases, and whether you've implemented multi-signature security that requires multiple parties to approve transactions. Your heirs also need to understand the difference between exchange-held crypto (which they can access like traditional accounts) and self-custodied holdings that demand technical steps to recover.
Estate planning becomes more complex when your net worth includes assets that exist only as cryptographic keys, but that complexity makes proper documentation even more critical.
Step 1. Gather your documents, passwords, and contacts
Your first task involves creating a master reference document that lists where your family can find critical papers when they need them. You don't need to gather physical documents into one location yet. Instead, you record the specific locations of birth certificates, marriage licenses, property deeds, insurance policies, and account statements. This step prevents your executor from spending weeks searching through filing cabinets, safe deposit boxes, and desk drawers.
Create a centralized document location list
Start by opening a simple spreadsheet or word processing document where you can list each important paper and its current storage location. The AARP estate planning checklist recommends organizing this information by category rather than by physical location, which makes it easier to verify you haven't missed anything.
Document categories you should include:
- Personal identification: Birth certificate, Social Security card, passport, driver's license
- Legal documents: Will, trust documents, power of attorney, healthcare directive
- Property records: Home deeds, vehicle titles, lease agreements, mortgage statements
- Insurance policies: Life, health, homeowner's, auto, disability, long-term care
- Financial statements: Bank account records, investment account statements, retirement plan documents
- Tax returns: Last three years of federal and state returns
For each item, write the exact physical location using specific details like "fireproof safe in master bedroom closet" or "safety deposit box #342 at First National Bank on Main Street." Generic descriptions like "in the office" force your family to search entire rooms.
Build your emergency contact registry
Your contact list needs to include the specific people and organizations that your executor must notify or consult. This goes beyond basic family phone numbers. You need account numbers, direct phone lines, and the names of specific representatives who handle your accounts.
Create a separate section that documents:
- Professional advisors: Attorney name, phone, email, and which documents they hold
- Financial institutions: Bank name, branch location, account numbers, customer service number
- Insurance agents: Company name, agent name, policy numbers, claims phone number
- Healthcare providers: Primary doctor, specialists, pharmacy, health insurance member services
- Employer contacts: HR department, benefits administrator, 401(k) plan sponsor
Your emergency contact list becomes worthless if the information sits outdated in a drawer for five years without updates.
Include login credentials or password hints for online accounts where appropriate, but never write full passwords in plain text. You can reference a separate password manager or encrypted file where you store actual login details. Your executor needs to know that this separate system exists and how to access it with proper authorization.
Step 2. Inventory assets, debts, income, and expenses
Your complete financial inventory forms the foundation of any estate plan. You need a clear snapshot of what you own, what you owe, and how money flows in and out each month. This information helps your executor understand the full scope of your estate and ensures nothing gets overlooked during settlement. The AARP estate planning checklist dedicates significant space to this step because incomplete asset documentation creates problems that can take years to resolve.
List every account and property you own
Start by creating a comprehensive asset table that captures account types, institutions, and approximate values. You don't need precise dollar amounts that you'll need to update constantly. Round to the nearest thousand or use ranges like "$50,000-$75,000" that remain useful even as markets fluctuate.

Your asset inventory should include:
| Asset Category | Specific Details to Record |
|---|---|
| Bank Accounts | Institution name, account type (checking/savings), last 4 digits of account number, approximate balance |
| Investment Accounts | Brokerage firm, account type (taxable/IRA/401k), account number, estimated value |
| Real Estate | Property address, purchase date, mortgage balance, estimated current value |
| Vehicles | Make/model/year, VIN, title location, loan balance if applicable |
| Life Insurance | Company name, policy number, death benefit amount, cash value if whole life |
| Business Interests | Company name, ownership percentage, whether you have a buy-sell agreement |
Document physical assets worth more than $1,000 individually. This includes jewelry, art, collectibles, or equipment that holds significant value. Your heirs need to know these items exist so they can obtain proper appraisals rather than donating valuable pieces to charity by mistake.
Document recurring income sources and monthly expenses
Your executor needs to understand your cash flow pattern to keep accounts current during estate settlement. List every income source including employment wages, Social Security benefits, pension payments, rental income, dividend distributions, or annuity payments. Include the payment frequency and approximate monthly amount for each source.
Regular expenses don't pause when someone passes away, and your executor must know which bills to pay immediately versus which accounts they can close.
Track your fixed monthly obligations like mortgage or rent, utilities, insurance premiums, loan payments, and subscription services. Variable expenses matter less for estate planning, but you should note any automatic payment arrangements that pull from your accounts. Your family needs to know about these recurring charges so they can cancel services or redirect payments before accounts drain unnecessarily.
Calculate net worth and update regularly
Subtract your total debts from your total assets to determine your current net worth. This number helps you evaluate whether your estate plan matches your actual financial situation. Someone with $2 million in assets but $1.8 million in debt faces different planning needs than someone with $200,000 in assets and no debt.
Update your inventory at least once per year or whenever you experience a major financial change. Marriage, divorce, home purchase, inheritance, or significant investment gains all trigger the need for immediate updates. Set a calendar reminder for the same date each year so this maintenance task doesn't slip through the cracks.
Step 3. Fix beneficiary and transfer on death details
Your beneficiary designations and transfer on death (TOD) instructions override whatever your will says. A retirement account that names your ex-spouse as beneficiary will go to that person even if your will specifies otherwise. The AARP estate planning checklist dedicates an entire section to these designations because outdated beneficiary information creates more estate disputes than almost any other planning mistake. You need to review every account that allows beneficiary naming and verify the information matches your current wishes.
Review all beneficiary designations on retirement accounts
Pull your most recent account statements for every retirement plan you own including 401(k), 403(b), traditional IRA, Roth IRA, and pension accounts. Look for the beneficiary section that shows primary and contingent beneficiaries. Primary beneficiaries receive assets first, while contingent beneficiaries inherit only if all primary beneficiaries have died.
Contact each plan administrator directly if your statements don't show beneficiary information. You can call the customer service number or log into the online portal to request a beneficiary designation form. Review what's currently on file rather than relying on memory about forms you might have completed years ago.
Your beneficiary form from 15 years ago might name your mother who has since passed away, leaving your account with no valid beneficiary and forcing it through probate.
Life insurance policies also use beneficiary designations that function the same way as retirement accounts. Request a current beneficiary form from each insurance company where you hold a policy. Some policies allow you to name percentages rather than equal splits, which gives you more control over how death benefits distribute among multiple heirs.
Update bank and brokerage transfer on death registrations
Most states allow you to add a TOD designation to bank accounts, certificates of deposit, and taxable brokerage accounts. This registration names who receives the account automatically upon your death without going through probate. You can add this designation to both individual accounts and jointly held accounts, though the process differs slightly for each type.
Visit your bank or call your brokerage firm to request their TOD beneficiary form. You'll need to provide the full legal names, Social Security numbers, and addresses for each person you name. Some institutions allow you to complete this process online through their secure portal, while others require a notarized signature on a physical form.
Avoid common beneficiary mistakes
The most frequent error involves naming minor children directly as beneficiaries. When a minor inherits assets, courts require establishing a guardianship that continues until the child reaches legal age. You should instead name a trust for the child's benefit or use your state's Uniform Transfers to Minors Act (UTMA) designation.
Another mistake happens when you name your estate as beneficiary rather than specific individuals. This forces the account through probate and exposes assets to creditor claims you could have avoided. Always name actual people, trusts, or charitable organizations rather than using "estate of" designations.
Check your beneficiary forms every two to three years and immediately after major life events like marriage, divorce, births, or deaths. Set a calendar reminder so this review becomes automatic rather than something you remember only during crisis moments.
Step 4. Create the core estate planning documents
Your legal documents form the backbone of your estate plan and give specific people the authority to act on your behalf. The AARP estate planning checklist guides you through the four essential documents that every adult needs regardless of age or wealth level. You should work with an attorney to draft these papers properly, but understanding what each document does helps you make informed decisions about who you name and what powers you grant.
Draft your will and consider a living trust
Your will tells the court how to distribute your property after you die and names a guardian for any minor children. You need to choose an executor who will handle the administrative work of settling your estate, paying final debts, and transferring assets according to your instructions. This person should be organized, trustworthy, and willing to take on the responsibility.
A living trust offers an alternative that avoids probate court entirely for assets you transfer into the trust during your lifetime. You serve as trustee while alive, maintaining complete control over trust assets. Your successor trustee takes over immediately upon your death or incapacity without court involvement. Trusts require more upfront cost and paperwork to establish, but they save time and maintain privacy that public probate proceedings cannot provide.
Establish power of attorney for finances and healthcare
You need two separate power of attorney documents that grant authority to people you choose. A financial power of attorney lets your agent access bank accounts, pay bills, file taxes, and handle investment decisions if you become unable to manage these tasks yourself. This document activates either immediately or only upon incapacity depending on how you structure it.
Healthcare power of attorney names someone to make medical decisions when you cannot communicate your wishes. This person talks to doctors, reviews treatment options, and decides whether to continue or discontinue life support. Choose someone who understands your values and will advocate for your preferences even under pressure from other family members.
Your power of attorney documents become worthless if the people you name don't know they've been appointed or cannot locate the papers when needed.
Complete advance directives for medical decisions
Your living will specifies which medical interventions you want or refuse in specific situations like terminal illness, permanent unconsciousness, or end-stage disease. You document preferences about artificial nutrition, hydration, mechanical ventilation, and resuscitation attempts. These written instructions remove the burden from family members who might otherwise disagree about what you would have wanted.
Give copies of your advance directives to your primary care doctor, local hospital, and the person you named as healthcare agent. Store the originals with your other estate planning documents and note their location on your master checklist. Update these forms whenever your wishes change or if you move to a different state that uses different legal formats.
Step 5. Plan for digital accounts and crypto self-custody
Your digital assets require different planning than traditional bank accounts because access depends on passwords, encryption keys, or seed phrases rather than legal documents alone. The AARP estate planning checklist addresses email and social media accounts, but it doesn't cover the technical requirements for self-custodied cryptocurrency that exists outside traditional financial institutions. You need to create clear instructions that allow your heirs to access these holdings without compromising security while you're alive.
Document online accounts and access procedures
Create a separate digital asset inventory that lists every online account holding value or important information. Start with financial accounts like PayPal, Venmo, or investment apps that hold real money. Then include email accounts, cloud storage, photo libraries, and social media profiles that contain personal data your family might want to preserve or close.
For each account, document:
- Service name and account URL: Specific login page address
- Username or email address: Exact credentials used to create the account
- Password storage location: Reference to password manager or encrypted file
- Two-factor authentication method: Whether you use SMS, authenticator app, or hardware key
- Recovery options: Backup email address or phone number linked to the account
Never write full passwords directly on your estate planning checklist. Instead, note that passwords live in a specific password manager like 1Password or Bitwarden and explain how your executor can access that system with proper legal authorization.
Create crypto wallet recovery instructions
Hardware wallets like Ledger, Trezor, or Tangem require specific technical knowledge to recover. Your family cannot simply present a death certificate to a customer service department. They need your seed phrase, which is the only key that unlocks your crypto holdings permanently.
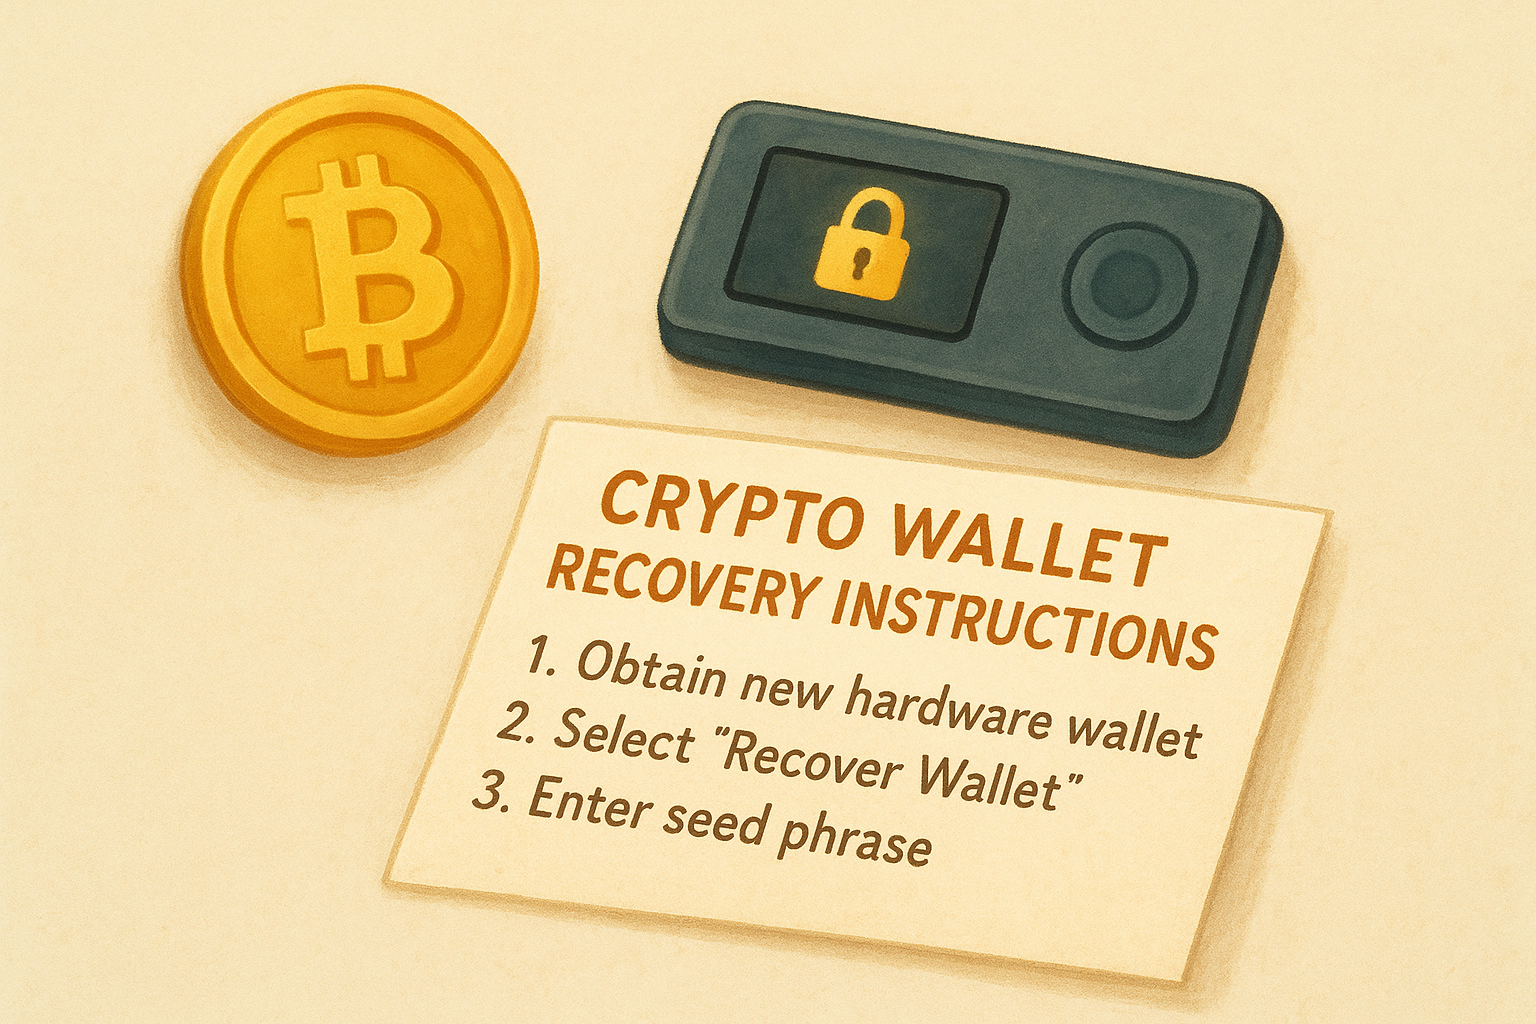
A hardware wallet without documented seed phrase access becomes a permanent vault that nobody can ever open, regardless of legal authority.
Write explicit wallet recovery instructions using this template:
CRYPTOCURRENCY HOLDINGS INVENTORY

Hardware Wallet Type: [Ledger Nano X / Trezor Model T / etc.]
Physical Location: [Fireproof safe in home office]
PIN Code Storage: [Sealed envelope in safety deposit box]
Seed Phrase Location: [Steel backup plate in safety deposit box #342]
Number of Words: [12 / 24 words]
Blockchain Networks: [Bitcoin, Ethereum, Polygon]
Approximate Holdings: [$50,000-$75,000 as of January 2026]

RECOVERY STEPS:
1. Obtain new hardware wallet of same type
2. Select "Recover Wallet" option during setup
3. Enter seed phrase from steel backup in exact order
4. Set new PIN code
5. Wallet will display same addresses and balances
List each hardware wallet separately if you own multiple devices. Include whether you've set up multi-signature requirements that need coordination between multiple people to move funds.
Store access information securely
Your digital asset documentation needs protection that balances security during your lifetime with accessibility after your death. Store these instructions in your fireproof safe or safety deposit box along with other estate planning documents. Never save unencrypted seed phrases on any device connected to the internet.
Consider using a sealed envelope system where you write seed phrases on paper, seal them in tamper-evident envelopes, and store them in separate physical locations. Your estate planning checklist then references these locations without exposing the actual recovery phrases until your executor needs them.
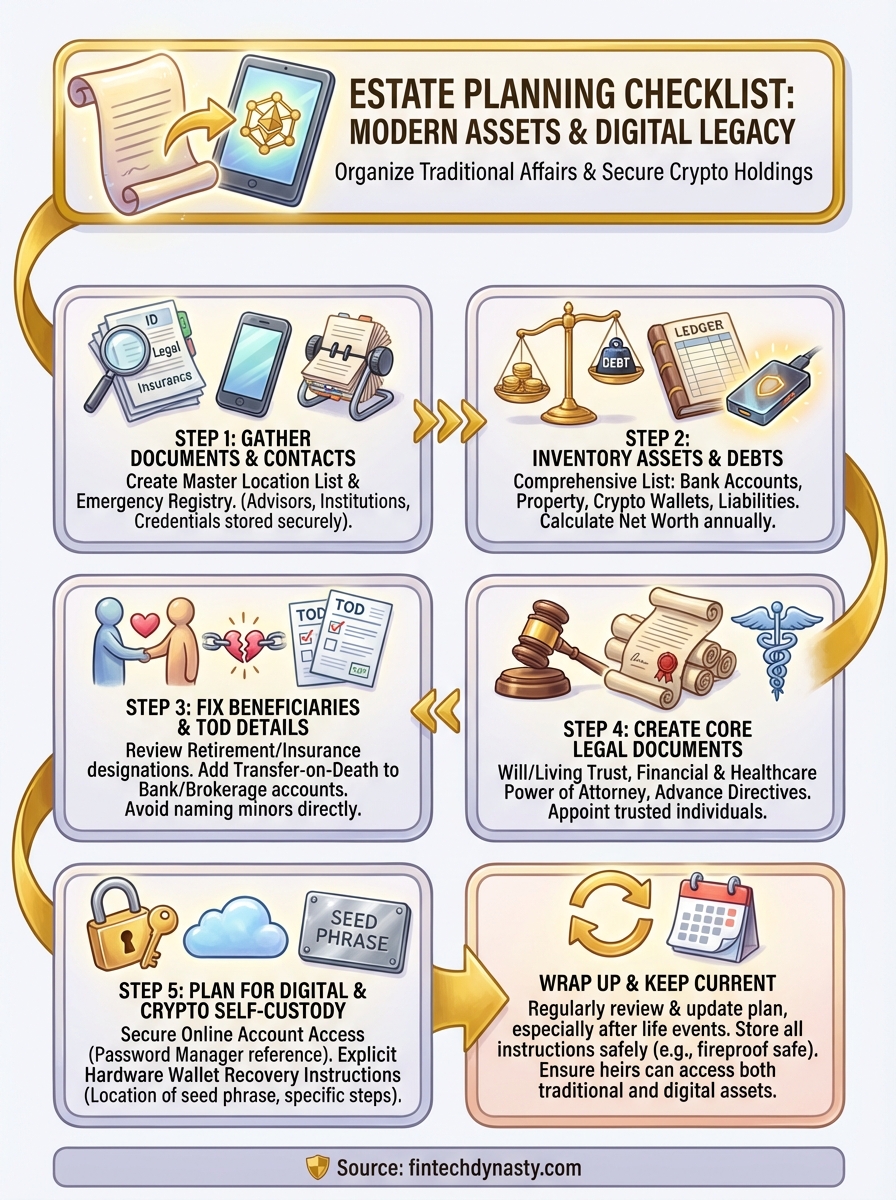
Wrap up and keep your plan current
Your AARP estate planning checklist gives you the structure to organize traditional assets, but completing the initial paperwork represents only the first step. Estate plans become outdated the moment you open a new bank account, purchase property, or add cryptocurrency to your holdings. Schedule a specific date each year to review your beneficiary designations, update account information, and verify that your executor still knows where to find critical documents.
Cryptocurrency holders face additional maintenance requirements because hardware wallet technology evolves and storage methods change. The seed phrase backup system that seemed secure five years ago might need upgrading to steel plates or multi-signature arrangements as your holdings grow.
Your digital assets deserve the same careful planning you apply to traditional wealth. FinTech Dynasty provides detailed guides on hardware wallet security and self-custody practices that complement your broader estate planning efforts. Review both traditional and crypto documentation regularly to ensure your family can access everything you've built.